2018年6月17日星期日

How to Add Songs to iCloud Music Library

How to Add Songs to iCloud Music Library
Part 1: How to Add Songs to iCloud Music Library
On iPhone/iPad


iPhone/iPad users can easily add songs to iCloud music library by taking the following steps.


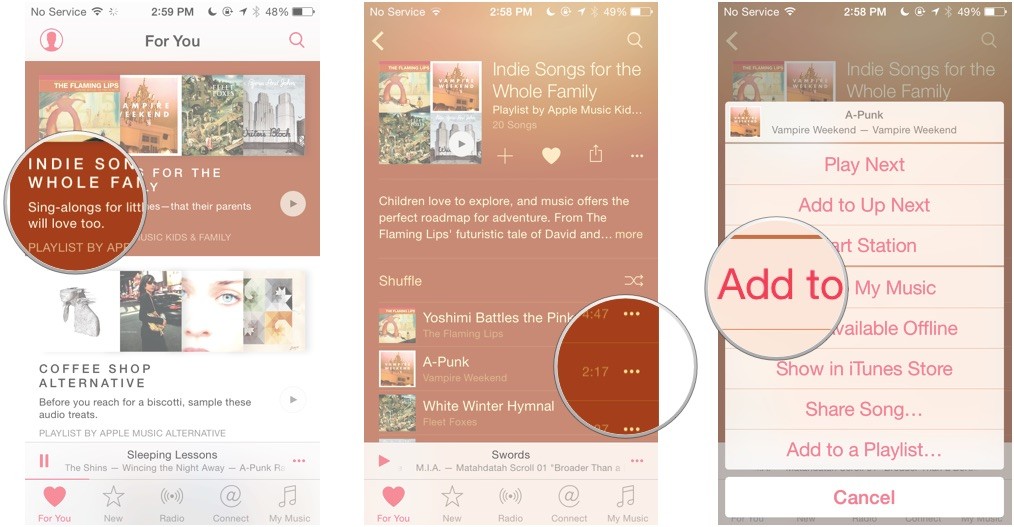
First, go to the Music app and choose the song to be added.


Click on the 3 dots button in the front of the music.


Then, click on Add to My Music.


On PC/Mac


The selected music will now be added to iCloud music library and will be available for instant play. However, if you intend to add songs to iCloud music library using your PC/Mac, follow the steps below.


First, go to iTunes and choose the song to be added.


Click on the 3 dots button in the front of the music.


Then, click on Add to My Music.


Part 2: How to Save iCloud Music for Offline Play


Using any of Apple’s devices, you can add any song you want to iCloud music library. But, what if you want to play your music offline, is that possible? Yes! Just follow the next steps to save your music and play it anytime offline.
On iPhone/iPad


Open Music app on your iPhone


Choose a song you prefer.


Tap 3 dots at the right side.


Click Make Available Offline.


You are done and can play offline from that moment.
On Mac


Go to iTunes on your device.


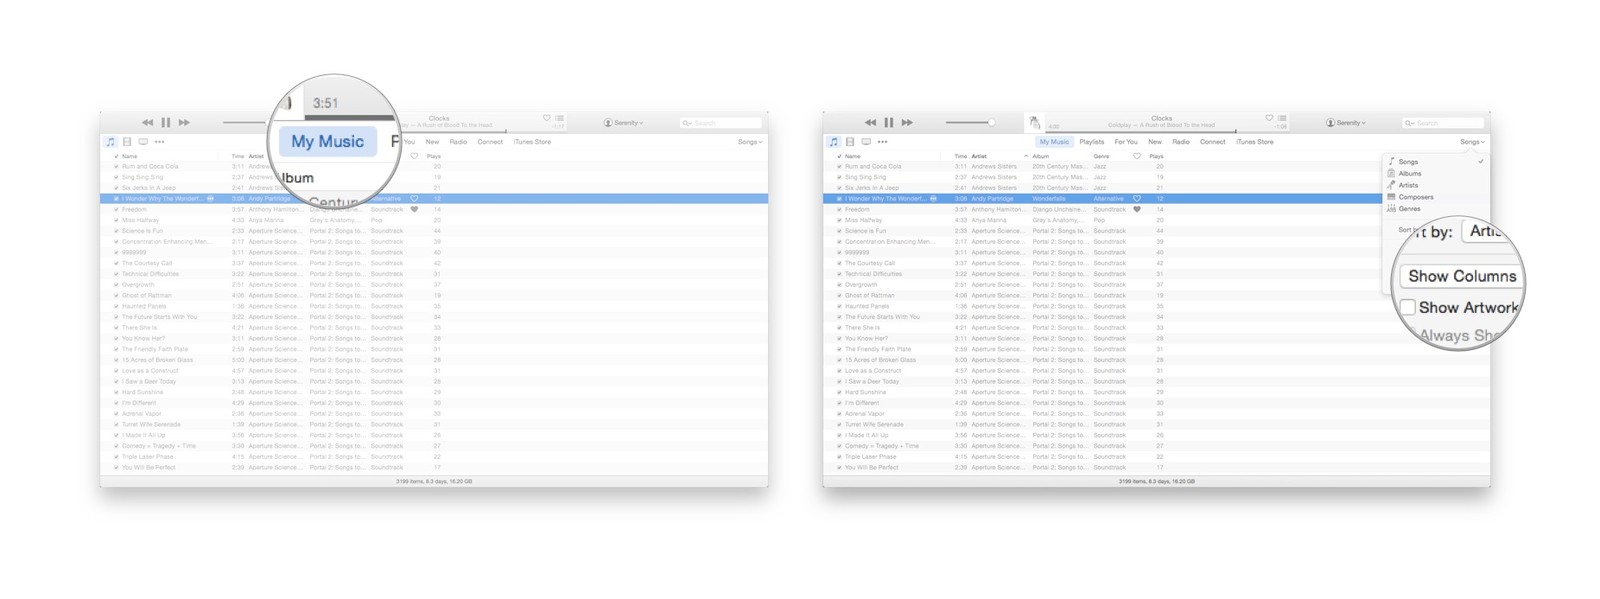
Click on My Music tab.


Tap on the view type drop down and choose the Show Columns.Gihosoft iPhone Data Recovery is a professional iPhone Data Recovery software to get back all your lost text message, photo, video, call history, note, contact and more from iPhone/iPad/iPod Touch. It offers a full solution to recover your lost data in different tough situations. Besides recovering data directly from iPhone, iPad and iPod touch, it also allows you to recover data from iCloud and iTunes backup files.


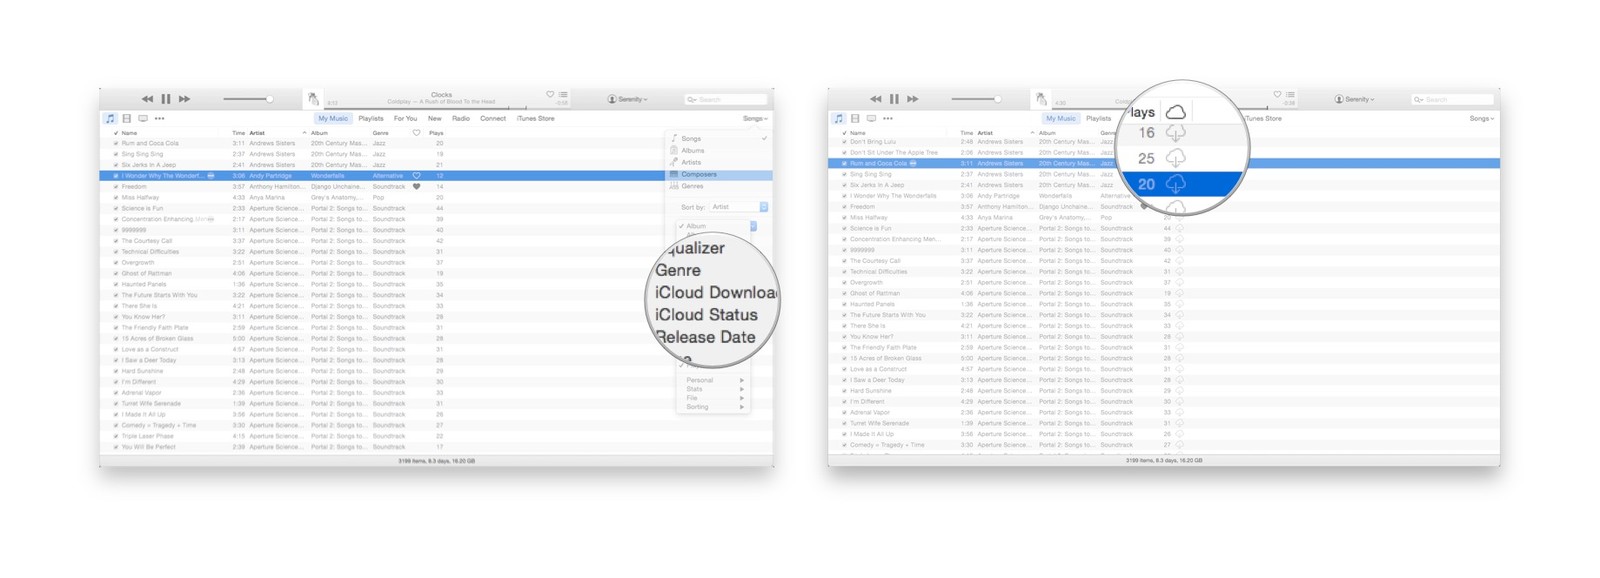
Tap the iCloud Download option.


Locate the cloud icon with a downward arrow and click to start downloading the track.


You are done and can play offline from that moment.
Note: Restrictions to add songs to iCloud music library


When trying to add music to iCloud music library from your iPhone or Mac, there could be some restriction issues. You should know that before adding songs, check to see if they are encoded in the formats of WAV, ALAC, or AIFF. All of these are usually transcoded to a separate temporary AAC 256 Kbps file locally, but the original files will remain unchanged.


When uploading, ensure that your iTunes iCloud Music Library is enabled so that no tracks will be lost between your PC and mobile devices.


You also need enough iCloud Space to save your music to iCloud. When you exceed free 5GB storage, you'll have to pay for more iCloud storage plan.

How to Sync Calendar from Mac to iPhone

Tip 1. Sync Mac calendar with iPhone via iCloud

You can now make use of iCloud to establish this task within short period. iCloud is an amazing online platform to sync most data type on your iPhone. Let us have a quick synopsis about the stepwise procedure to synchronize Mac calendar with the iPhone through iCloud platform.
Step 1: Launch your Mac and navigate to ‘System preference’ option.
Step 2: Continue and click on ‘iCloud control panel’.
Step 3: Enter into your Apple account by typing your credentials in the respective fields.
Step 4: Check for ‘Calendars’.
Step 5: Unlock your iPhone and click on the ‘Settings’ option.
Step 6: Select ‘Your iCloud Account’ from the displayed list.
Step 7: Choose ‘iCloud’ and turn on the Calendars from the expanded items.
Step 8: The data will be automatically get synchronized by completing this procedure.
Sync Mac calendar with iPhone via iCloud
Follow the steps above to sync calendar with your iPhone through the iCloud platform. The steps are very simple and you can follow up without any difficulty.

Tip 2. Sync calendar from Mac to iPhone via iTunes

For an alternative of iCloud,  iTunes also enables to sync iphone calendar with mac. Check it out the tips below for successful results.Gihosoft iPhone Data Recovery is a professional iPhone Data Recovery software to get back all your lost text message, photo, video, call history, note, contact and more from iPhone/iPad/iPod Touch. It offers a full solution to recover your lost data in different tough situations. Besides recovering data directly from iPhone, iPad and iPod touch, it also allows you to recover data from iCloud and iTunes backup files.

Step 1: Launch the latest version of iTunes on your computer and connect your iPhone to your PC through the data cable.
Step 2: Press the ‘iPhone device’ button available in the iTunes platform and continue to tap ‘info’ option in the list.
Step 3: In the right side panel check on the ‘Sync Calendars’ and ‘All Calendars’ option.
Step 4: Press the ‘Apply’ button to trigger the synchronization process.
Step 5: Check your calendar in your iPhone soon after the completion of the above discussed steps.
You can adopt similar steps to synchronize any data from Mac to iPhone through iTunes platform.

Tip 3. Sync Mac outlook calendar with iPhone

It is now possible to sync Mac outlook calendar with your iPhone within few simple steps. Just glance through the steps for better understanding.
Step 1: Select ‘Services’ option from the Tools tab.
Step 2: From the divided screen check the ‘Calendar’ option in the left panel.
Step 3: Choose the account from ‘Select the accounts to sync’.
Step 4: In the Outlook folder respond to the popup menu by adding new item at the respective place.
Step 5: Press the ‘Ok’ button and close the ‘Sync services’ window.
Step 6: The synchronization process duration depends on the size of your calendar.
Step 7: After the completion of synchronization process open your iPhone and check out the synchronized data.
I am sure by surfing through the above steps you can now easily synchronize the calendar using the Outlook service.